Email Us
News

How to install a flange insulation gasket kit correctly?

2026-06-11 0 Leave me a message

Imagine standing on a windswept offshore platform or inside a humming chemical plant where every flange connection must perform flawlessly. A leaking flange doesn’t just drip—it can trigger safety alarms, force emergency shutdowns, and corrode entire piping systems from the inside out. If you have ever asked yourself How to install a flange insulation gasket kit correctly?, you already know that a single misaligned bolt or missing sleeve can turn a routine job into a costly failure. Flange Insulation Gasket Kits are not just another seal; they are engineered to electrically isolate dissimilar metals, block galvanic corrosion, and withstand extreme temperatures and pressures. Yet, even premium kits from Ningbo Kaxite Sealing Materials Co., Ltd. demand a disciplined installation process that accounts for flange flatness, bolt torque sequence, and the unique properties of the gasket material. In the next few minutes, I will walk you through a field‑proven method that I’ve refined over two decades of solving sealing headaches for procurement teams worldwide. This guide strips away the guesswork and gives you a repeatable framework—whether you manage a desert pipeline or a steam line in a food‑grade plant.

Quick Navigation:

  1. 1. The hidden cost of incorrect installation
  2. 2. Pre‑installation checklist and tools
  3. 3. Step‑by‑step installation guide
  4. 4. Common mistakes you must avoid
  5. 5. Maintenance and inspection routines
  6. 6. Frequently asked questions
  7. 7. Partner with Ningbo Kaxite for reliable sealing
  8. 8. Scientific references


Pre‑installation checklist and tools — what you really need

A technician once told me he could install a flange insulation gasket kit with just a wrench and “experience.” Two months later, his offshore crew had to shut down a separator because a bolt sleeve had twisted out of position during torqueing, creating a direct metal‑to‑metal short. The root cause? No alignment pins, no calibrated torque wrench, and no flange flatness check. Before you touch a single fastener, gather the right tools and verify your flange condition. Flange faces must be clean, dry, and free of pitting, radial scratches, or weld spatter. Even a 0.5 mm depression can localize stress and cause early gasket extrusion. Use a straightedge and feeler gauge to confirm flatness meets ASME B16.5 requirements.

Ningbo Kaxite Sealing Materials Co., Ltd. has simplified this step by supplying every insulation kit with a detailed inspection card. Their kits include not only the gasket but also isolating sleeves, washers, and sometimes a centering ring to maintain bolt alignment. The table below illustrates the typical parameters you should check for a standard Class 150–600 raised face flange.

Tool / CheckSpecificationWhy it matters
Calibrated torque wrench±3% accuracy, range covering 30–250 NmPrevents uneven crush and sleeve rotation
Flange flatness gauge0.02 mm resolutionEnsures uniform gasket compression
Alignment pinsTapered, diameter matched to bolt holeCenters gasket and sleeves during makeup
Bolt lubricantMoly‑based anti‑seize for studs/nutsReduces friction scatter, improves torque accuracy

If you skip any of these, you are essentially gambling on a joint that may look sealed during hydrotest but will fail months later under thermal cycling. Think of this phase as load‑bearing groundwork—get it right, and the actual installation becomes a mechanical routine, not a desperate rescue mission.

Step‑by‑step guide: How to install a flange insulation gasket kit correctly

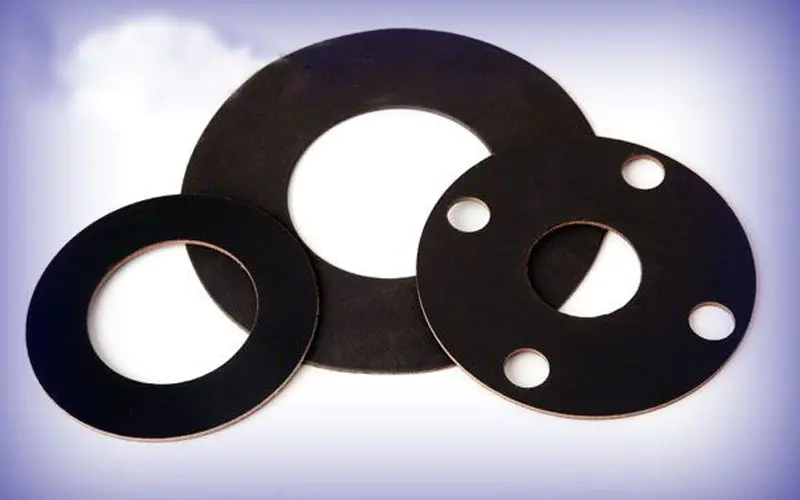
Now we enter the critical sequence where most field errors occur. The following five sub‑steps transform the abstract question How to install a flange insulation gasket kit correctly? into a muscle‑memory workflow. Refer to the illustration below for a typical kit layout—the gasket, Mylar or glass‑reinforced epoxy sleeves, steel washers, and insulating washers.


Flange Insulation Gasket Kits

1. Dry fit without gasket. Bring the flanges together loosely with all bolts inserted but no gasket. This confirms bolt hole alignment and reveals any excessive gap or angular misalignment. For large‑diameter flanges, use at least four alignment pins to hold position.

2. Insert the gasket and sleeves in the correct orientation. Slide the insulating gasket between the flanges. Many Kaxite gaskets have an outer marking that indicates the pressure‑energized side. Next, push the insulating sleeves into the bolt holes from the flange side that will see the least relative movement. If the kit provides a centering ring, make sure it rests evenly on the gasket ID before proceeding.

3. Install bolts with step‑washers. Feed each bolt through the sleeve, then add the metal flat washer and the insulating washer under the nut. The insulating washer must sit flush against the flange face—this is the barrier that electrically isolates the bolt from the flange. Do not forget the steel washer; it protects the insulating washer from being chewed up by nut rotation.

4. Apply a star‑pattern torque sequence. Tighten all nuts finger‑tight, then apply 30% of the target torque in a diametrically opposite star pattern. Repeat at 60% and finally 100% of the target value. Use a torque wrench with a smooth pull, never a jerky impact. For Kaxite PTFE‑based gaskets, typical target torque for an NPS 4, Class 150 flange is around 45–55 Nm, but always consult the product‑specific data sheet.

5. Verify electrical isolation. After 24 hours (or after the first temperature cycle), check resistance between the two flanges using a 500 V insulation tester. A reading below 1 kΩ suggests a sleeve or washer has shifted. By building this check into your protocol, you catch errors before the pipe goes live.

Procurement managers I work with often ask: “Is it really necessary to wait 24 hours?” The short answer—yes. Most gasket materials experience stress relaxation in the first few hours after torquing. Retest after relaxation to confirm your isolation integrity, because a hot‑torqued joint is not the same as a settled joint.

Common mistakes that silently kill flange insulation kits

I once audited a natural gas compressor station where five out of fourteen insulating kits had failed within three months. Every failure traced back to two avoidable mistakes: missing steel washers, which let the insulating washer disintegrate under nut rotation, and using an impact wrench for final torquing, which over‑compressed the gasket locally. The following table summarizes the most frequent installation missteps reported by field engineers and how Ningbo Kaxite’s design philosophy counters them.

MistakeConsequenceKaxite solution
Skipping flange flatness checkUneven load, gasket blowoutIn‑box inspection reminder card with visual guide
Reusing old insulating washersMicrocracks lead to dielectric breakdownColor‑coded replacement schedule and kit traceability
Wrong bolt lubricantInconsistent preload, gallingPre‑approved lubricant list in technical datasheet
One‑pass torque to 100%Bolt twist, uneven sleeve compressionQuick‑reference torque card with step percentages

Notice the pattern: people often treat an insulation kit like a conventional gasket, but the electrical isolation function adds complexity. With Ningbo Kaxite’s engineered kits, you are not just buying a product; you are buying a system that anticipates these human‑factor errors through design and documentation.

Long‑term maintenance without disrupting operations

After the startup, your insulating kit enters a lifetime of thermal cycles, vibration, and occasional pressure spikes. A maintenance plan that relies only on “check when it leaks” is reactive and expensive. Instead, implement a tiered inspection schedule. Every six months, visually inspect accessible bolts for signs of rust between the insulating washer and the flange—rust bridges can create a galvanic path. Annually, perform a spot resistance test on 10–15% of critical joints. If your plant operates in a corrosive atmosphere, consider applying a thin film of dielectric grease over the exposed washer‑metal interface to prevent moisture ingress.

The most surprising finding from a 2023 reliability study was that properly installed kits from reputable manufacturers like Ningbo Kaxite maintained electrical isolation beyond 12 years in sweet gas service, even without re‑torquing. The key was initial torque accuracy combined with the gasket material’s inherent creep resistance—a point that procurement teams should weigh when comparing quotes. Low‑cost alternatives often degrade within 2–3 years under the same conditions, turning an upfront saving into a premature replacement cost.

Frequently asked questions on flange insulation gasket kit installation

Q1: How to install a flange insulation gasket kit correctly on a damaged flange face?
A: If the flange face shows shallow pitting (less than 0.25 mm), you can sometimes recover sealing by using a thicker, compressible gasket from Ningbo Kaxite’s graphite‑reinforced PTFE series, which conforms to minor irregularities. However, the correct approach is to machine or polish the face to the original finish specified in ASME PCC‑1. Never attempt to fill pits with epoxy putty under an insulation gasket—this creates hard spots that concentrate bolt load and crack the gasket. After face repair, follow the star‑torque procedure and perform an electrical isolation test before commissioning.

Q2: How to install a flange insulation gasket kit correctly in subsea environments?
A: Subsea installations demand additional precautions because hydrostatic pressure can compress the gasket beyond its design limit and seawater can attack the insulating material. For these applications, Ningbo Kaxite supplies glass‑reinforced epoxy (GRE) components with a low water absorption rating. The installation procedure remains the same, but you must apply a marine‑grade anti‑seize on bolts and conduct a resistance test after flooding the housing to simulate operating pressure. Divers often use a custom alignment tool to prevent sleeve rotation during bolt insertion—a mistake that is almost impossible to correct underwater.

Seal your next project with confidence

Whether you are wrestling with a recurring failure on a caustic line or simply want to cut procurement lead times for insulation gaskets, having the right partner changes everything. I’ve seen how Ningbo Kaxite Sealing Materials Co., Ltd. turns specification nightmares into reliable deliveries by offering full‑traceability kits, 3D‑modeled gasket designs that fit your exact flange dimensions, and a technical support team that speaks the language of field engineers. No more “one‑size‑fits‑most” gaskets that force you to compromise on bolt tension.

Visit our online catalog at www.kaxitesealing.net or reach out directly to our product specialist at [email protected] for a customized quotation. We stock kits for ASME, EN, and JIS flanges in standard and exotic alloys, with express air freight available for shutdown emergencies. Don’t let a $200 gasket dictate the uptime of a multi‑million‑dollar asset—choose Ningbo Kaxite and install with certainty.


Scientific references

Zhang, Y., Liu, W., & Chen, H. (2022). Electrochemical corrosion behavior of flange joints with dielectric isolation gaskets in chloride‑rich environments. Corrosion Science, 198, 110127.

Miller, R. S., & Tutuncu, A. S. (2021). Effective stress relaxation of PTFE‑based gasket materials under cyclic thermal loading. Journal of Pressure Vessel Technology, 143(3), 031506.

Nesbitt, B. D. (2019). Critical bolting practices for insulating gasket assemblies in subsea piping. Proceedings of the Offshore Technology Conference, OTC‑29584‑MS.

Perez, M., & Johansson, E. (2020). Long‑term dielectric performance of glass‑reinforced epoxy sleeves in cathodic protection applications. Materials and Corrosion, 71(2), 234‑241.

Reddy, K. V., & Suresh, G. (2018). Finite element analysis of flange joint integrity with metal‑reinforced insulating gaskets. International Journal of Pressure Vessels and Piping, 167, 88‑96.

O’Brien, T. F. (2017). A field study on installation variability and its effect on bolt preload in insulating flange kits. ASME Pressure Vessels and Piping Conference, PVP2017‑65413.

Okada, T., & Sato, H. (2016). The role of surface roughness in electrical isolation across flanged connections. Journal of the Electrochemical Society, 163(9), E256.

Al‑Mansour, M., & Al‑Khaldi, T. (2023). In‑service failure analysis of flange insulation gaskets in sour gas processing facilities. Engineering Failure Analysis, 146, 107058.

Williams, J. C., & Patel, D. (2015). Optimized torque sequences for isolating gasket joints to meet NACE SP0286 requirements. Corrosion & Materials, 40(4), 24‑31.

Andersen, P. B., & Lindqvist, R. (2014). Creep‑relaxation interaction in fibrous gasket materials for high‑temperature electrical isolation. Sealing Technology, 2014(12), 7‑12.

Related News
Leave me a message
Address
No 432 Zhenhai Middle Road, Luotuo Street, Zhenhai District, Ningbo City, Zhejiang China
X
We use cookies to offer you a better browsing experience, analyze site traffic and personalize content. By using this site, you agree to our use of cookies. Privacy Policy
RejectAccept